Monday, March 25, 2013

Painting Nursery Furniture

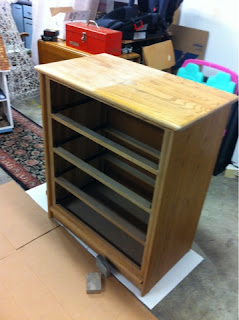
Some of you may (or may not) know that we have been back at my mom's house...again...for the last few months. This time, waiting to be able to move into our new apartment which is being renovated! (Currently still unfinished while I only have 4 1/2 weeks to go! Stress...) Getting ready for a new home while getting ready for a new baby has been rough. I've hoarded baby stuff in one corner of our living space, while boxes of kitchen things, linens, and decor have been piled in another corner. For months! It's enough to drive a nesting preggo girl mad! So I've taken on some projects. Here are a couple before shots of our crib and dresser:


Here I had only sanded half of the dresser, just to show the difference.

The crib was my daughter's, and it converts to a toddler bed, and full sized bed as well. I was tired of the black, and it won't match anything in the room because Alexis's big girl bed is white. So since gray is one of the room colors, gray it will be.

We are still on the fence about whether or not we are going to paint the dresser. It was mine when I was a little girl, so I don't want to mess with it too much, and it's going to go in the closet so no one will really see it anyway. But in the off chance we might move it out of the closet and into the room, it would be nice if it matched. We'll see.

But here is the progress of the crib!


We decided to assemble the crib before painting. I had talked to several people about it before hand, and most said not to, but I went with my gut, and it worked out amazingly!


The paint we used was Valspar, in Stone Mason Gray, with a high gloss enamel finish. The guy at Lowes assured me that this would make it safe for the baby, even if he's chewing on it. So, guy at Lowes, if my son ends up with a mouthful of crib, it's on you! Ha!
Anyway, the kid's room is painted gray also, Almost Charcoal is the color, and I wanted this to be a little lighter.


I had been planning this for months just waiting for Cam and I to both be in the project-y mood to do it, and then I totally freaked out at the last minute! It must have been a pregnancy thing, but suddenly the thought of painting it and all the things that could go wrong made me not want to. Luckily my husband knows me better than that and got my head in the game.


Because I love it!


The color is exactly what I wanted, and I think Talon's new bedding will pop against it.
We finished the painting into 2 hours, and finished the second coat later that night in one hour. It was much quicker and smoother than I thought it would be!

NOTE: I'm not recommending painting your crib! I am pretty sure it voids the warranty, and as I said I'm going on what someone at Lowes told me, not the maker of the crib, as far as the safety of the paint.

Sunday, March 24, 2013

Home-made Baby Book

So I realized the other day that we didn't have a baby book for talon like we'd had for Alexis. Like to put info and pictures and mementos in, like the hospital bracelet, family info, etc.
So I went online to find one.
And Oh.Em.Gee.
Why are they so darn expensive? The cheapest one was $25 (at Target) only available online, with no pictures of the inside, and the cover was bland and generic. The average price anywhere else online seemed to be around $35, and on Etsy they averaged at around $60!

So, my brilliant husband asked me why I didn't just make one myself? And I thought, hey, that's an awesome idea!
I spent an hour and a half that night coming up with pages for the book (birth stats, all about mom, all about dad, the day you were born, etc) some of which I found inspiration for online, and some that was just information I wanted to put in.
I also went online and had coupons texted to my phone for Michaels, our local craft store, because I knew that that was where I would get most of what I needed.

The next day we headed out to run our errands, Michaels being one of them, and we were surprised at how few actual baby albums they had. Well for boys anyway. They seem to have plenty of everything for girls everywhere we go, but for boys? Well, that's a different post in and of itself...
So we decided to really do it ourselves.
I found a beautiful turquoise blue photo album with no embellishments or pattern, just a pocket for a photo on the cover.
The I found stick-on letters in burlap, a small pack of multi-colored jute twine, matching mod-style flowers (not feminine looking at all), and the best part, a stick-on fabric banner that matches the banners we made by hand for the baby shower! One of those banners is going into the kids room, so this album is going to match, and look great displayed on a shelf or dresser top.
I also found a 180 sheet card stock paper pack that was perfect. I searched forever and finally found one that was just colors and modern patterns.
The album and paper were both Recollections brand and were 40% off! The little embellishments for the cover were about $4 each so those added up quickly. I used a 40% off coupon for one of them. I'm wishing I had waited until today because I happen to have a coupon (starting today) for 20% off your entire order including sale items! So that would have actually saved me a bundle. But I was anxious. :)

I started by laying out all my finds on the table. Then I arranged and rearranged until I had the cover looking how I wanted.
I love how it turned out! You'll have to excuse the poor photo quality. I take all my pictures on my iphone, no fancy camera's in this house!


In order to get the jute twine to look how I wanted it too I had tied it around the cover, just to see how it would look. Then I liked it so much I didn't want to disturb it, so I just hot-glued it right down as it was. The knot in the middle was a little ugly, so I used one of the owl clothespins I bought in the Michaels sales bin (for $1.50) pulled the felt owl off carefully, and hot-glued it right over the knot.


Then I took my "pages" I'd printed out and my giant paper pack and did it the easy way. Slide in a pattern, then a page on top. Only one is glued down and that is because it has two small captions for spots for the hospital bracelet and footprints. The last few pages are still blank but I have captions all ready and they will be filled with pictures. The fonts I used for the basic pages can be downloaded for free, they are Duality (the font in gray), and Ribbon (in colors).


I plan on putting a picture of Talon in the cover but for now I decided to slip an ultrasound photo in.


I also created a subway-art style print that I am going to put in the kids room, but I thought it would also make a good first page of the book! The fonts are all downloaded free, they are Sketch Rockwell, Boston Traffic, and again Duality. I just used my Microsoft Works program and took my time fitting them all to take up about the same amount of space. The dots separating the sections are periods done in the Boston Traffic font, but on paint so that I could get them to do what I wanted them too. Then I inserted them like clip-art.


I really love how it turned out and how personalized it is! What do you think?

Sunday, March 10, 2013

Baby shower!


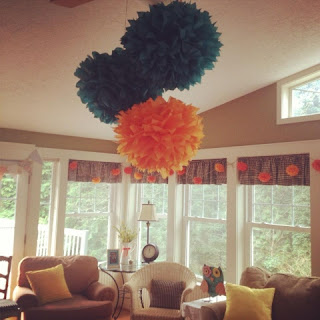
 Yesterday marked my 32nd week of pregnancy, only eight more to go! And last weekend was my baby shower. It was small, just family and close friends, but it was so fun and relaxed! The colors were the same as my kids room is going to be, so a lot of the shower decor will find new life there. I have to say, my mom's sunroom is the perfect room for parties! We rearrange the furniture and add different decor for almost every shower and party we have. The snacks were made by my mother and I, the punch was a recipe I found on Pinterest and edited which I will share in another post, most food was made by my mother, one dish was made by my sister's mother-in-law, and as far as decor I will include credits at the bottom. Without further ado, pictures!


These are the prize bags! We found the bags on clearance at Target, and I hot-glued twine and little mini-flags on them to match the larger banners we'd made.

The invitations were SO cute. We found them on Etsy (credit below), printed them at Walmart, and we found this frame again on clearance at Target!

These large poms we found on Etsy (credit below) and we used twine to hang them from the ceiling fan. They came with clear fishing line for hanging, but the garlands we bought from the same shop we ordered on twine so we wanted them to match.

These garlands were the best decoration! They are different shades of orange on twine, and we hung them from the curtains using safety pins.

We made several of these banners and hung them across the doorways and also above the present table. We bought all the paper at Michaels (most on clearance for 20 cents a sheet) and were able to get 3 good sized flags out of each sheet. Then we punched holes in the corners and threaded them onto twine in a specific pattern similar to the one on the invites.

These are the sweets made by my mother and I, and the cupcakes were iced by my sister and I. The marshmallows are dipped in white chocolate and sprinkles, and they're skewered on gray chevron paper straws. The pretzel rods are also dipped in white chocolate and sprinkles. The cupcakes were a special recipe created by my mom (almond vanilla, with sour cream in them which keeps them moist!), and the frosting was a special recipe also.


Me, my momma, and the little munchkin before the party started.

The flowers sent by my husband that arrived in the middle of the shower. :) He's so sweet! They were even prettier when they were all alive. In this picture only the carnations are still kicking.

Some party preview shots!


Credits:
Poms and pom garlands purchased from:                                       Pom+Love on Etsy
Invitations purchased from:                                                            katiedidesigns on Etsy
Gray striped paper straws purchased from:                                     BakeMeAParty on Etsy
Cute matching tin owl purchased from:                                           Ross
Yellow pillows (originally for the kids room) purchased from:             Target
Paper and twine for banners and assorted decor purchased from:     Michaels
The original Punch recipe can be found:                                          here (but we did tweak it a bit for ourselves, more on that later!)